AI Wedding Photo Editing: How to Streamline Your Workflow and Deliver Magic
You just finished shooting a beautiful wedding—10 hours, a thousand precious moments captured. Now, you’re staring at a memory card full of images, knowing the real work is about to begin. Sound overwhelming?
For wedding photographers, the joy of the shoot is often followed by the daunting task of culling, correcting, and retouching hundreds of photos. This is where AI isn’t just a cool trick; it’s a game-changing partner that can save your sanity and elevate your final gallery. This guide will show you how to weave AI into your wedding workflow to work smarter, faster, and more creatively.
Why AI is a Wedding Photographer’s Best Assistant
A wedding day is unpredictable. You battle mixed lighting, hurried portraits, and moments that flash by in an instant. AI understands these challenges and can help solve them in bulk, handling the technical heavy lifting so you can focus on artistry and emotion.
The AI-Powered Culling Process: From Hours to Minutes
The first bottleneck is choosing the best shots from thousands. AI culling tools are like a super-fast, unbiased first editor.
- Facial Recognition & Emotion Detection: AI can sort photos by person (grouping all shots of the couple, parents, bridal party) and even flag the ones with the most genuine smiles and open eyes.
- Technical Flagging: It automatically tags images that are too blurry, have blown-out highlights, or are poorly composed, letting you quickly filter them out.
- This doesn’t replace your artistic eye, but it eliminates 80% of the tedious clicking, letting you focus on selecting the images with the best feeling and moment.
The “Digital Darkroom” Magic: Batch Editing with AI
Once you’ve selected your images, AI can apply consistent, professional corrections across the entire set.
- AI-Powered Presets & Profiles: Tools like Adobe Lightroom now have AI that analyzes your photo and suggests or applies a perfect profile match, creating a cohesive base look in one click.
- One-Click Sky Enhancement: Did an overcast sky wash out the drama of your outdoor ceremony shots? AI can subtly enhance a gray sky or even replace it with a more fitting twilight or sunset, maintaining realistic lighting on your subjects.
- Intelligent Color Grading: AI can analyze skin tones and ensure they remain perfect and consistent across every photo, whether the light was warm indoor bulbs or cool shade.
“AI in wedding editing isn’t about creating a fake day; it’s about effortlessly revealing the true beauty and emotion that was always there, hidden by the limits of the camera.”
Building Your Streamlined AI Wedding Workflow
Integrating AI doesn’t mean overhauling everything you do. It’s about slotting smart tools into your existing process to supercharge it. Here’s a practical, step-by-step workflow.
| Workflow Stage | Traditional Task | AI-Powered Solution | Time Saved |
|---|---|---|---|
| Stage 1: Import & Cull | Manually scrolling, comparing, and rejecting. | Use AI Culling Software (e.g., Aftershoot, Narrative Select) to auto-select top shots. | 5-10 Hours |
| Stage 2: Global Corrections | Applying presets, adjusting white balance & exposure per photo. | Apply AI-Preset Matching & use AI Subject/Background Masking for light adjustments. | 2-3 Hours |
| Stage 3: Retouching | Manual spot removal, teeth whitening, skin smoothing. | Use AI Portrait Tools (e.g., in Lightroom or Luminar Neo) for batch facial enhancements. | 3-4 Hours |
| Stage 4: Final Polish | Manually dodging/burning, adding subtle effects. | Use AI for local adjustments (e.g., “brighten subject”) and creative effects like AI Bokeh. | 1-2 Hours |
Crucial Tip: Always, always backup and work on copies of your original RAW files. AI is a powerful tool for non-destructive editing, but protecting your originals is non-negotiable.
To see the real impact, the chart below compares the average time spent on a wedding gallery using a traditional all-manual workflow versus a streamlined AI-assisted approach.
The time savings are dramatic, freeing you up to shoot more weddings or simply get your life back.
Mastering the AI Tools for Key Wedding Moments
Let’s get specific about how to use AI on the trickiest, most important shots.
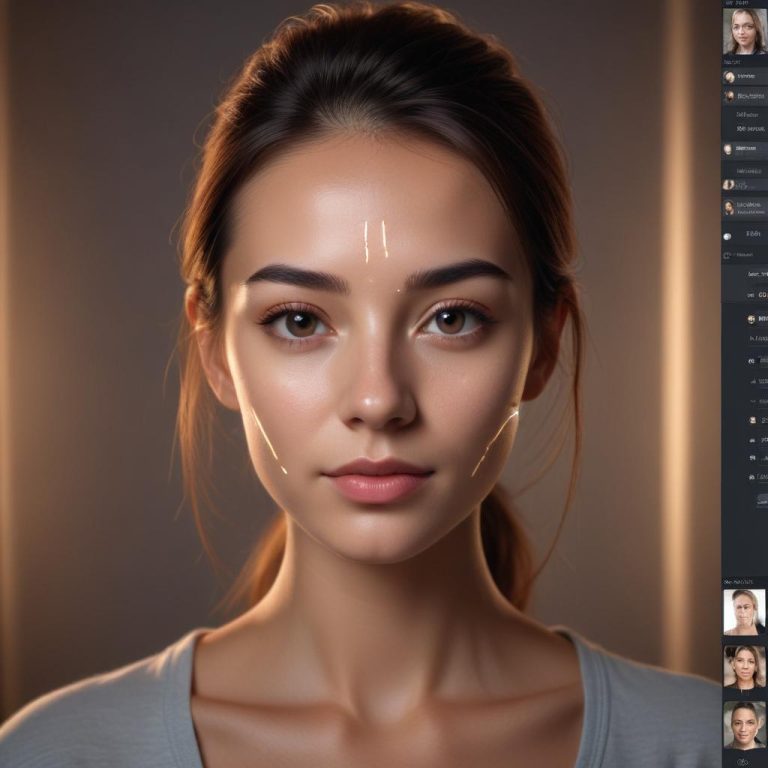
1. The Bride’s Portrait: Flawless, Not Fake
This is where subtlety is everything. Use AI masking to select just the skin, then apply minimal smoothing that retains texture and freckles. Use an AI “teeth whitening” brush and an “eye brighten” tool to make features pop naturally. The goal is enhancement, not alteration.
2. The Large Group Shot: Getting Everyone’s Best
Someone always blinks. With AI group shot tools (like in Photoshop), you can automatically blend the best faces from multiple takes into one perfect final image. It seamlessly composites expressions without any grueling manual cutting.
3. The Low-Light Reception: Saving the Dance Floor
Dark, noisy reception photos can be saved. Use an AI denoiser (like Topaz DeNoise AI or Lightroom’s AI Denoise) to magically clean up grain while preserving detail. Then, use an AI mask to selectively brighten the subjects, making them stand out from the moody background.
Frequently Asked Questions
Does using AI make my editing “cheap” or less professional?
Absolutely not. It makes you efficient and consistent. Using a darkroom was once the professional standard; now it’s software. AI is the next logical tool. Your artistic decisions—which moments to keep, the final mood, the crop—are what clients pay for.
Will clients know I used AI?
They won’t notice “AI.” They will notice a faster delivery time, a more consistent gallery, and stunning images where the focus is on their joy, not a stray hair or a temporary blemish. That’s all they care about.
What’s the best all-in-one software for AI wedding editing?
Adobe Lightroom Classic is the industry powerhouse for a reason. Its integrated AI masking, denoising, and profile matching make it a one-stop shop for 95% of the workflow. For specialized retouching, Luminar Neo has fantastic creative AI tools.
How do I handle client expectations about AI alterations?
Transparency is best. In your contract or guide, you can state you use “advanced digital processing tools to ensure the highest quality final images.” Most clients are thrilled with better results faster.
What’s the biggest mistake when starting with AI?
Overdoing it. The most common error is sliding the “smooth skin” or “sky replacement” strength to 100%. Always pull back. Use AI to achieve a natural, believable version of the day, not a hyper-realistic fantasy.
Reclaim Your Time and Creativity
Integrating AI into your wedding photography workflow isn’t about cutting corners. It’s about cutting out the repetitive, uninspiring tasks that drain your energy. It’s about getting out of the digital darkroom faster so you can be present for more “I dos,” or simply enjoy a Sunday off.
The future of wedding photography belongs to those who combine a human heart for moments with a smart use of the best tools available.
What part of your wedding editing workflow takes the most time? Are you excited or hesitant to try AI? Share your thoughts in the comments below!