Use Double Exposure Effect in Your Edits (With Free Tools)
Double exposure photography creates magical images that look like they came straight from a dream. This artistic technique combines two photos into one stunning piece, creating layered stories that capture attention instantly. What used to require expensive darkroom equipment and years of practice can now be done on your phone or computer using completely free tools. Whether you want to blend a portrait with a cityscape or merge nature scenes with silhouettes, double exposure effects can transform ordinary photos into extraordinary art.
The double exposure effect combines two separate images by blending them together, typically using a silhouette or high-contrast subject as the base layer and a detailed texture or scene as the overlay. This technique creates depth, mystery, and visual storytelling that makes viewers look twice. With free mobile apps like Snapseed, GIMP on desktop, or even built-in phone features, anyone can master this eye-catching effect without spending money on premium software or professional equipment.
Understanding the Double Exposure Concept
Double exposure started in film photography when photographers accidentally exposed the same frame twice, creating ghostly, overlapping images. Today, we recreate this effect digitally by carefully layering two photos and adjusting how they blend together.
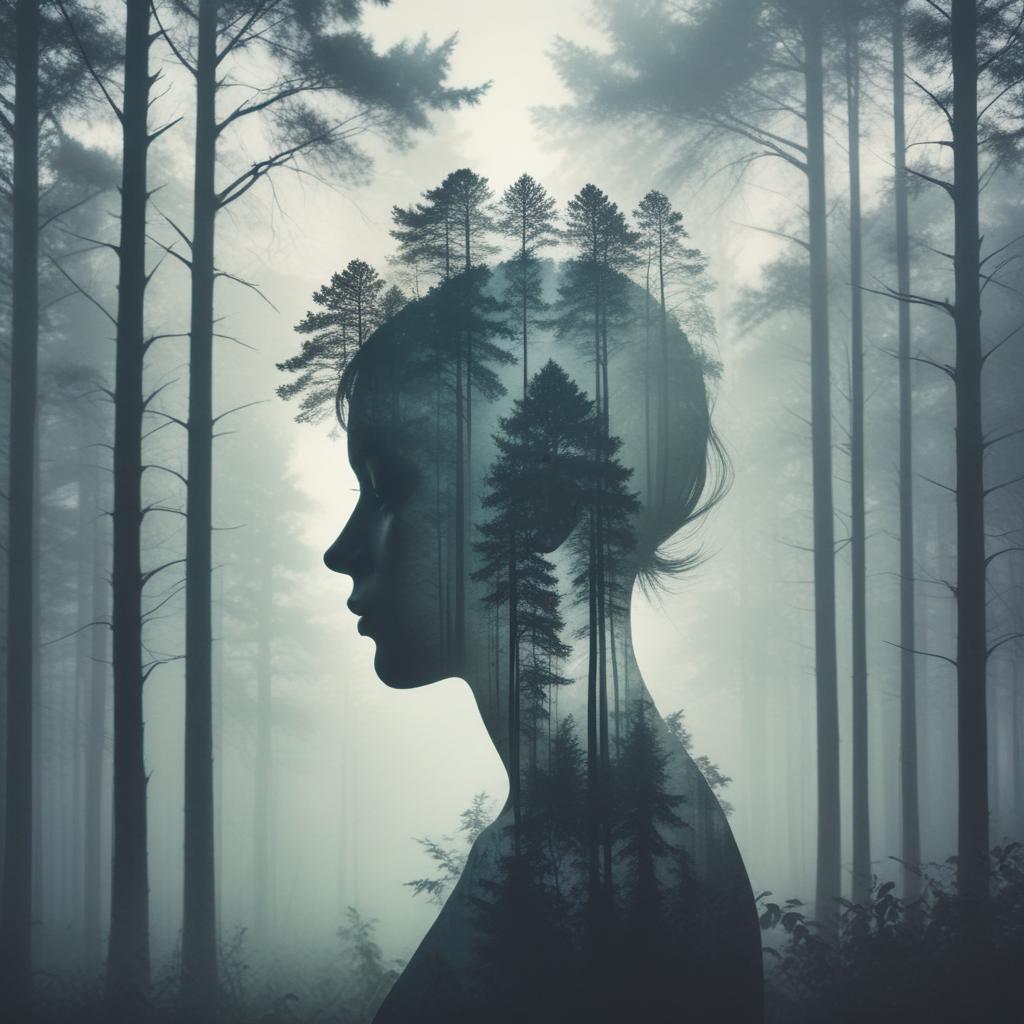
The magic happens when you combine contrasting elements. Think of a person’s profile filled with a forest scene, or a city skyline emerging from someone’s silhouette. The key is choosing images that tell a story together while maintaining visual balance.
Successful double exposures need three main ingredients: a strong silhouette or high-contrast base image, an interesting texture or pattern for the overlay, and thoughtful blending that doesn’t muddy the details. When these elements work together, you get images that feel both mysterious and meaningful.
Choosing Your Base Image
Your base image should have clear, defined shapes with good contrast between light and dark areas. Portrait silhouettes work wonderfully, but don’t limit yourself. Buildings, trees, bottles, or any object with interesting shapes can serve as your foundation.
Black and white base images often work better than color ones because they create cleaner separations. The dark areas will show your overlay image, while light areas will remain mostly unchanged.
Take or find photos with simple backgrounds. Busy, cluttered scenes make it harder to control where your overlay appears and can create confusing results.
Free Mobile Apps for Double Exposure
Snapseed: The Professional Choice
Snapseed remains the gold standard for free mobile photo editing, and its double exposure capabilities are impressive. Open your base image, then go to Tools > Double Exposure. You can adjust the opacity of your overlay image and move it around until the positioning looks perfect.
The app offers different blend modes like Screen, Multiply, and Overlay. Screen mode works great when your base image has dark areas you want to fill, while Multiply creates deeper, more dramatic blends.
Snapseed also lets you mask areas where you don’t want the overlay to appear. This control helps you fine-tune exactly where the second image shows through.
Adobe Photoshop Express
While Adobe’s full Photoshop costs money, Photoshop Express is completely free and handles double exposures well. The interface feels familiar if you’ve used other Adobe products, and it syncs with Creative Cloud for easy file management.
Use the “Blend” feature to combine images, then experiment with different blend modes. The app includes helpful tutorials that walk you through the process step by step.
Canva Mobile
Canva isn’t just for graphic design – its mobile app creates beautiful double exposures too. Upload both images, place the overlay on top of your base, then adjust transparency and blend modes until you achieve the look you want.
Canva’s strength lies in its templates and design elements. You can add text, frames, or other graphics to enhance your double exposure effect.
Desktop Solutions That Won’t Cost You
GIMP: The Powerhouse Alternative
GIMP (GNU Image Manipulation Program) offers professional-level features without the professional price tag. While it has a learning curve, its double exposure capabilities rival expensive software.
Open your base image, then add your overlay as a new layer (File > Open as Layers). Change the blend mode of the top layer to Screen, Multiply, or Overlay depending on your desired effect. Adjust the opacity until the blend looks natural.
GIMP’s layer masks give you precise control over where each image appears. Paint with black on the mask to hide parts of the overlay, or paint with white to reveal them.
Photopea: Browser-Based Magic
Photopea runs entirely in your web browser but works almost exactly like Photoshop. No downloads, no installations – just open the website and start creating. This makes it perfect for quick edits or when you’re using someone else’s computer.
The double exposure process mirrors GIMP: open your base image, add the overlay as a new layer, then experiment with blend modes and opacity. Photopea even supports PSD files if you need to work with Photoshop documents.
Paint.NET with Plugins
Paint.NET is free Windows software that becomes incredibly powerful with the right plugins. Download the “Blend Modes” plugin pack to access advanced blending options that rival premium software.
The interface feels more approachable than GIMP, making it great for beginners who want desktop-level control without overwhelming complexity.
Step-by-Step Double Exposure Tutorial
Let’s walk through creating a double exposure using Snapseed, though these steps work similarly in other apps:
Step 1: Choose your base image – ideally a silhouette or high-contrast photo. Open it in Snapseed.
Step 2: Tap Tools > Double Exposure. Select your overlay image from your photo library.
Step 3: The overlay appears on top of your base image. Use two fingers to move, rotate, and resize it until the positioning looks good.
Step 4: Adjust the opacity slider at the bottom. Start around 50% and fine-tune from there.
Step 5: Experiment with blend modes by tapping the blend icon. Try Screen for lighter effects or Multiply for darker, more dramatic results.
Step 6: Use the eraser tool to remove parts of the overlay where it doesn’t look right. This step requires patience but makes the biggest difference.
Advanced Blending Techniques
Masking is your secret weapon for professional results. Instead of applying the overlay to the entire image, use masks to control exactly where it appears. This prevents the overlay from muddying important details in your base image.
Color matching makes your double exposure look cohesive. Adjust the temperature, tint, and saturation of both images so their colors complement each other rather than clash.
Try inverting your overlay image for unexpected results. Sometimes a negative version creates more interesting textures and patterns.
Creative Ideas and Inspiration
Portrait + Nature Combinations
Fill a person’s silhouette with forest scenes, ocean waves, or mountain landscapes. This classic combination suggests harmony between humans and nature. Sunset skies work particularly well because their warm colors complement skin tones.
Position the nature scene so important elements like tree branches or wave crests align with facial features for added visual interest.
Urban Meets Organic
Contrast cityscapes with natural textures like tree bark, flowers, or clouds. The hard lines of buildings against soft organic shapes create compelling visual tension.
Night city photos with their glowing lights work beautifully when blended with flowing water or smoke patterns.
Abstract and Geometric Patterns
Don’t limit yourself to realistic scenes. Geometric patterns, fabric textures, or abstract art can create stunning double exposures that feel more like modern art than traditional photography.
Mandala patterns and sacred geometry designs work especially well with portrait silhouettes, creating spiritual or meditative imagery.
Common Mistakes and How to Avoid Them
| Mistake | Why It Happens | Solution |
|---|---|---|
| Muddy, unclear results | Using two busy images | Choose one simple base, one detailed overlay |
| Overlay too obvious | Not blending properly | Adjust opacity and use appropriate blend modes |
| Poor positioning | Not considering composition | Align interesting elements with facial features or key shapes |
| Clashing colors | Images have conflicting color schemes | Color-match both images before blending |
| Lost details | Over-blending both images | Keep some areas of base image clean and unblended |
| Fake appearance | Not masking properly | Use selective editing to blend only where it makes sense |
| No focal point | Equal emphasis on both images | Make one image dominant, the other supportive |
| Repetitive results | Using same blend mode always | Experiment with different blend modes for each project |
Troubleshooting Your Double Exposures
When your double exposure doesn’t look right, step back and analyze what’s wrong. Too dark overall? Try Screen blend mode or increase the overlay’s brightness before blending. Too light and washed out? Multiply blend mode or reducing opacity might help.
Colors looking weird? Check if your base image has strong color casts that are affecting the overlay. Convert the base to black and white first, then blend your colorful overlay for cleaner results.
If details are getting lost, try the “sandwich” technique: duplicate your base layer, put it on top of everything, and set it to Soft Light or Overlay at low opacity. This brings back some original contrast and definition.
When to Start Over
Sometimes the images just don’t work together, no matter how much you adjust them. Strong compositional conflicts, incompatible lighting directions, or scale mismatches can make blending impossible.
Don’t waste hours fighting problem combinations. It’s often faster to choose different source images than to force incompatible ones to work.
Sharing and Showcasing Your Work
Double exposures look fantastic on social media, especially Instagram and Pinterest where visual impact matters most. Square crops often work better than rectangular ones for social sharing because they show more detail on mobile screens.
Add subtle vignetting around the edges to draw attention to the center of your composition. A slight darkening of the corners helps contain the viewer’s eye within the frame.
Consider creating series of related double exposures rather than just one-off images. Three to five images exploring the same theme or color palette create more impact when displayed together.
“The best double exposures tell stories that neither original image could tell alone. They create new narratives from existing pieces.”
Taking It Further
Once you master basic double exposures, try triple exposures by adding a third image at very low opacity. This adds another layer of complexity and visual interest.
Animated double exposures using apps like Plotagraph or Cinemagraph create mesmerizing moving images perfect for social media stories or website headers.
Experiment with color-specific blending where you blend only certain colors from your overlay. This advanced technique requires more sophisticated software but creates unique results.
FAQ
Q: What types of photos work best as base images? A: High-contrast images with clear silhouettes work best. Think portraits shot against bright backgrounds, building outlines, or objects with interesting shapes. Black and white images often blend more cleanly than color ones.
Q: Can I create double exposures with my phone’s built-in camera app? A: Some phones have double exposure modes built into their camera apps, but they’re usually limited. Third-party apps give you much more control over the final result and let you use existing photos.
Q: How do I make sure my double exposure doesn’t look fake? A: Pay attention to lighting direction and color temperature in both images. Use masking to blend selectively rather than applying the effect everywhere. Less is often more – subtle blends look more natural.
Q: What’s the difference between blend modes like Screen and Multiply? A: Screen lightens the image and works well when you want the overlay to appear in dark areas. Multiply darkens and works when you want the overlay in light areas. Overlay provides balanced blending of both.
Q: Can I sell double exposure images I create with free tools? A: Yes, as long as you own the rights to both original photos. Many stock photography sites accept well-executed double exposures. Just make sure you’re not using copyrighted images you don’t have permission to modify.
Q: Why do my double exposures look different on different devices? A: Screen calibration varies between devices. Edit on the device where your audience will most likely view the images, or use a properly calibrated monitor for professional work.
Q: How can I make text readable over a double exposure background? A: Use semi-transparent overlays behind text, choose high-contrast text colors, or mask out areas where text will appear to keep them simpler and less distracting.